How to improve ankle dorsiflexion
A simple ankle sprain is the most common sports injury affecting every sport on the planet. We can even find ways to sprain the lateral ligaments by walking on uneven surfaces or if a dog shoots out and we need to move out the way very quickly.
Ankle injury is common but still poorly understood!
Ankle injuries are the most common musculoskeletal injury presented to Emergency departments around the world. Yet only 55% of people seek medical treatment from physiotherapists or medical professionals. Often ankle stiffness and pain persist. This can lead to a complex problem…. chronic ankle instability or CAI.
It seems like a relatively minor injury right? But a recent research postulates ‘Is there such a thing as a simple ankle roll?’ Medical literature quotes close to 64% of ankle sprains result in chronic ankle instability. There is also up to 80% ankle recurrence in high risk sports like basketball. So what are we missing in rehabilitation?
What actually happens when you roll your ankle?
Lets have a look at what happens when you roll your ankle, that is to say you have a hyper-supination or a plantar flexion and inversion mechanism of injury. A rolled ankle!
As the ankle rolls inwards the lateral ligament complex are the first passive restraint to injury. Usually the ligaments will tear anterior to posterior. So the anterior talofibular ligament (ATFL) will injure first, then the calcaneofibular (CF). The posterior talofibular ligament (PTFL) is not often torn in these mechanisms unless the ankle injury is so significant it subluxes! The other reason for this is the PTFL is lax in plantarflexion so the ligament tends not to get injured in the usual mechanism of landing on somebodies foot in basketball! With significant forceful injuries there is often concomitant fractures present and radio graphic imaging is crucial to determine the extent of the damage.
Now as we all know the talus does not have any muscle attachments. So the problem lies in the fact that the talus position in the ankle is entirely a result of its ligaments attachments and the position of the subtalar joint of which it sits on.
In high grade ankle injuries, the ATFL is the first to injure and can often rupture completely! Studies of tissue mechanics show, it is also the weakest of the ankle ligaments in stress-strain testing. Hence it’s susceptibility to rupture.
So what does this mean?

Without an intact ATFL the talus will translate or move anteriorly in the ankle mortise. This will change the joint mechanics and block dorsiflexion movements. You can tell this when somebody takes their knee over their foot the will fell pain in the anterior ankle joint instead of in the calf musculature. That is the ankle is impinging (of blocking) with dorsiflexion. This pain gives the stiff ankle sensation that you can’t roll over in normal walking and will result in limping or rolling the entire leg out into external rotation. People here will complain of anterior ankle pain when performing dorsiflexion movements. This can be tested with a knee to wall or toe to wall test.
If left untreated, and with time the posterior capsule of the ankle will shorten and further restrict the ability to dorsiflex. As well as keep the talus in an anterior position contributing to ongoing ankle impingement pain.
Concurrently with this, the fibular also has lost a connection to the talus. With this relationship severed (ATFL rupture) the fibular stability is also compromised. The fibular will adopt a position superior and posterior relative to the talus. Some studies suggest will affect peroneal function and impair its ability to act as a dynamic stabilizer of the ankle. So the flow on effect from a simple ankle sprain is already getting quite complicated!
How do we get the ankle joint moving?
One of the prime goals of rehab is to get the talus to sit as far back into the mortise as quickly as possible to give the best chance for the ATFL to scar up, stabilize the fibular and promote normal joint kinematics.
How I would attack the ankle mobility problem only would be to release every structure that will limit dorsiflexion and contribute to ankle stiffness.
I would work from those tissues that are furthest from the ankle joints axis of rotation and work deeper to those elements closer to the axis of rotation. I would reassess ankle range of movement (ROM) at the beginning of treatment and every step along the way using the toe or knee to wall test or a fluid goniometer measurement.
Firstly, I would release the musculature of the posterior tibial compartment. In particular the gastrocnemius, soleus and flexor hallucis longus are the key muscles here. There are many techniques to use here including massage, trigger point therapy, active release therapy or cross fibre frictions to mention a few. Stretching is unlikely to be effective at this stage. The reason being is the joint blocking or pain will be the first resistance point not the tight muscles. That is to say the pain when a calf stretch is performed, pain will be present on the front or around the ankle joint itself. The pain is a joint restriction not a muscle restriction, but we are trying to remove the joint restriction and get a normal muscle stretch ultimately.
If teaching techniques for athletes or to heal thyself
The knee into the calf technique (see image below). This gives the right amount of force to get the desired release for those without Hulk strength hands! Manipulation of the knee into medial and lateral channels the entire length of the calf should get every trigger point in this area. You could also self massage your calf using this positioning with some moisturizer. On the under leg you can pump your ankle into plantar flexion and dorsiflexion for some active release on stretch.

Reassess the goniometer measurement or toe/knee to wall measurement and note the effect. Time to move onto the next stage.
Next is posterior ankle frictions at maximum dorsiflexion
Place the effected foot up on a chair or bench in a position of dorsiflexion.

Then use your fingers as shown in the picture to flush the posterior malleolar space distal to proximal, acupressure tender areas or friction the posterior ankle capsule for elongation to improve ankle stiffness. Prescription three sets of x two minutes of frictions or flush is a great starting point. Mobility in this area of the ankle capsule allows the talus to sit more posteriorly where it should be.
Reassess you objective measure of ankle dorsiflexion. Ankle range of movement should be increasing!
After several cycles of this treatment a calf stretch may be achievable. If not the joint may be still too irritable and requires more compression, active assisted movements, ice water immersion and elevation.
If the joint is subacute that is to say minimum 3-4 days post injury in mild circumstances or 7-10 days in severe ankle sprains. Then using leverage and mobilization with movement (MWM) becomes a treatment option to turbo charge the ankle mobility! Enter TarsoPro™ for home, crossfit gym or athletic clinics.
Using ankle mobility devices like TarsoPro™ at home can speed up you ankle mobility recovery!
Physiotherapists and other medical professionals are aware of the techniques developed by Brian Mulligan a New Zealand physiotherapist who is believed to have coined the terms SNAGS and mobiliisation with movement (MWM). These are joint mobilisations with contractions and accessory joint motions. The TarsoPro™ uses these principles of isometric contractions and seatbelt material for strong leverage to achieve capsule lengthening. When you are attempting to elongate capsular structures with high concentrations of collagen, strong and longer duration holds are important to use Creep and Hysteresis tissue principles. As a physiotherapist having to generate these type of forces on large athletes in a treatment setting can be difficult on the hands and body of the therapist! Easy to use at home, gym or in the clinic, TarsoPro™ will greatly improve ankle mobility.
5 minutes with TarsoPro™ Daily will keep the ankle mobility at peak levels!
Here is how it works!
How TarsoPro™ Works - Video
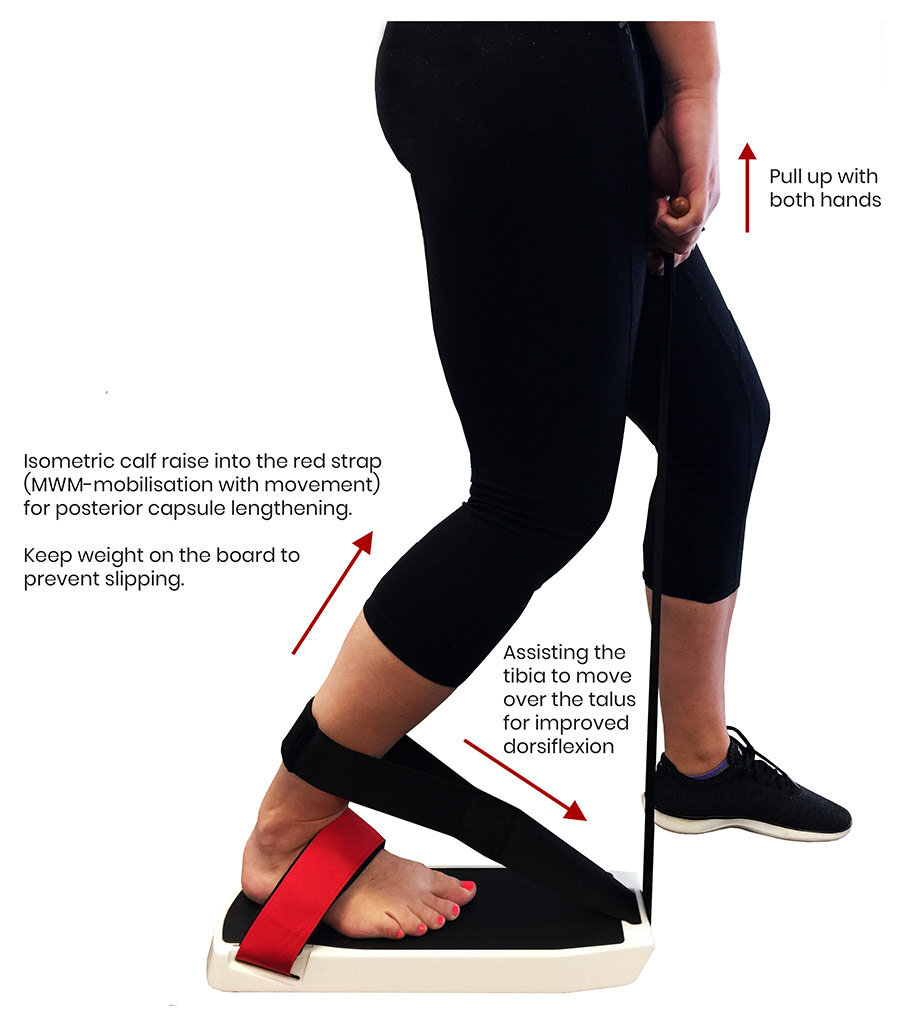
The two actions of TarsoPro™ are:
An isometric calf raise into the resistance of the red strap keeps the talus stabilized and elongates the posterior capsule to allow the talus to sit more posteriorly in the ankle mortise
Pulling on the wooden handle translates the tibia anteriorly over the talus also assisting normal ankle joint kinematics with walking and running
There are some other variations of use but these are seen in the videos on the website
Made for clinics, gyms or individuals
The TarsoPro™ is built to last and will serve you well in the toughest of settings be it with a team, in a crossfit competition or a clinic.